
I started to discover the power of wiring tasks in Node-RED recently. Since I am a passionate ROS programmer, I was wondering if this flow tool could also help to make robot programming more transparent and reproducible. I was surprised how much more sense I could add to robotic programming by using this visual tool. I am now using my Turtlebot 2 together with ROS indigo and Node-RED. This BLOG post shall be the first of a small series of posts with the intent to share my experiences with a greater community. This first post is about setting up the software. Furthermore, I want to give a very small example how to view a Turtlebots odometry in a Node-RED flow.
Installing the Software
- ROS indigo (on Ubuntu 14.04 )
- Kobuki and Turtlebot packages (either from .deb or Github)
- ROSbridge for Robot Web Tools
- NodeJS (V6.10)
- Node-RED
- Node-RED extra nodes: node-red-contrib-ros
I assume you already have a basic knowledge of using ROS and, thus, I only link to the installation instructions at this point. The Kobuki and Turtlebot ROS packages can either be installed from the corresponding Ubuntu packages or they can be cloned from the Github repositories directly into your Catkin workspace. I also added a section on how to use this tutorial in the ROS Gazebo simulator only. So, you do not need a real Turtlebot to play around. However, the battery state visualization will not work in the simulator. To enable ROS message transfer for Web interfaces, we also need to install the ROSbridge package.
- The following commands will install all necessary ROS packages from Ubuntu package source.
apt-get install ros-indigo-turtlebot*
apt-get install ros-indigo-rosbridge-suite
- NodeJS version 6 was used in this tutorial. Do not install the very old .deb packaged Version of NodeJS that comes with the Ubuntu 14.04 sources. Install commands for version 6 are given below.
curl -sL https://deb.nodesource.com/setup_6.x | sudo -E bash -
sudo apt-get install -y nodejs
- Once installed, NodeJS includes the Node Package Manager NPM. Use NPM to install Node-RED as a global module to be available for all users. You can already start Node-RED without ROS support after installation.
sudo npm install -g --unsafe-perm node-red
node-red
- Node-RED automatically uses the default workspace directory ~/.node-red/ to store flows and additional nodes. The ROS node can be installed to this workspace directly using the command below.
cd ~/.node-red/
npm install node-red-contrib-ros
Booting the Software Stack
We need to startup the ROS nodes necessary to control our (real) Turtlebot. Also, we start the Node-RED environment and use the ROS node (inside Node-RED) to send and receive ROS messages. You may find it confusing to use the word node for ROS programs as well as for graphical representations in a workflow at the same time. Unfortunately, I am not fully able to avoid this confusion, but I will try to use the word node mostly in the context of Node-RED, not ROS. Let’s boot!
- Start the Turtlebot bringup package to startup your robot.
roslaunch turtlebot_bringup minimal.launch
- Start the ROS bridge and for Web access. This will run rosbridge and create a WebSocket on port 9090 by default.
roslaunch rosbridge_server rosbridge_websocket.launch
- Start Node-RED and create a configuration node in order to communicate with the ROS master.
node-red
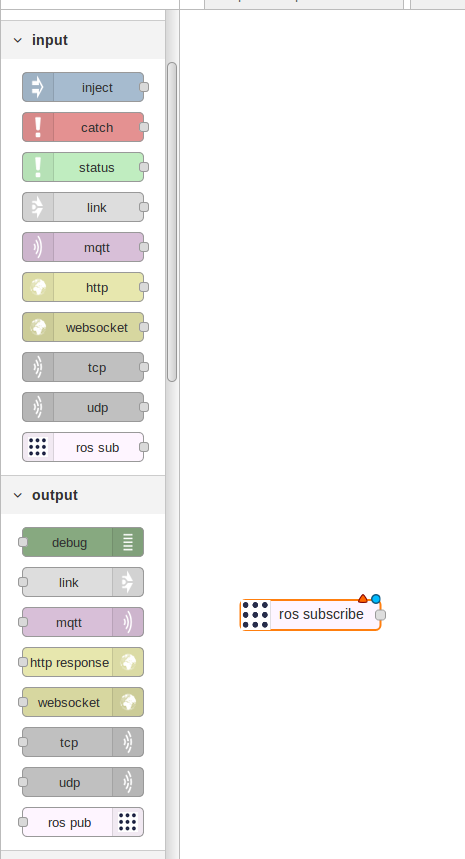
ROS node contrib 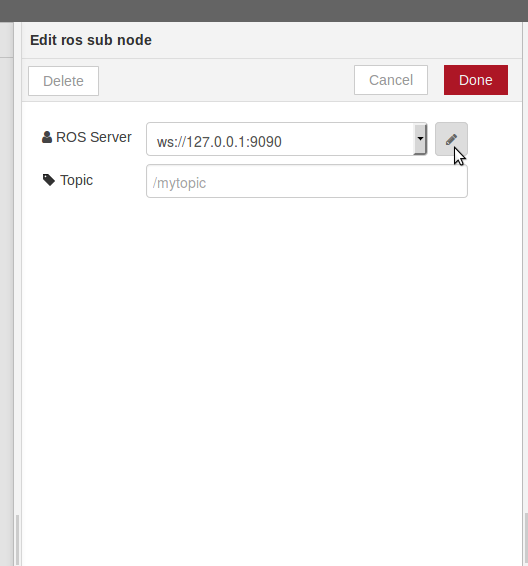
Edit subscription node 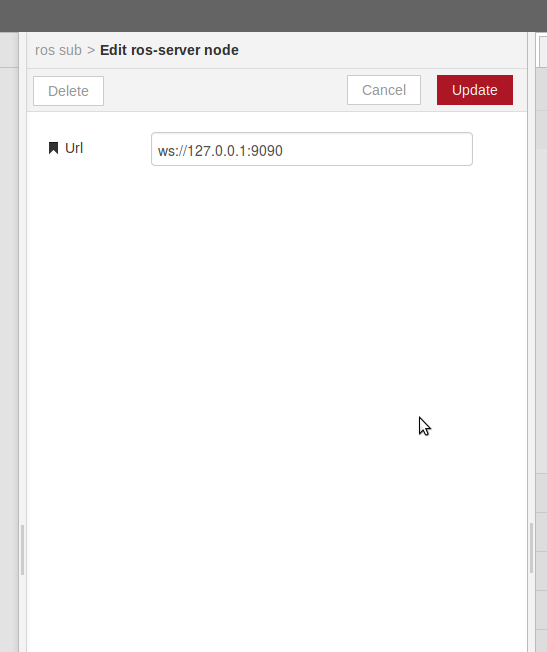
Edit ROS server config node
Congratulations, we have managed to make contact with the ROS system from a Node-RED flow. In the next step, we will subscribe to a topic and process the data we get.
The first flow that contains a ROS subscription
In this paragraph, we subscribe to the /odom topic and show the output in a debug view. You can copy/paste the flow from below to try a simple /odom subscriber.
[
    {
        "id": "f0068d88.1517f",
        "type": "tab",
        "label": "Odom Subscription"
    },
    {
        "id": "f41b7a35.858bf",
        "type": "ros-subscribe",
        "z": "f0068d88.1517f",
        "server": "81037215.2ccc8",
        "topicname": "/odom",
        "x": 170,
        "y": 300,
        "wires": [
            [
                "64ec1ad3.029844"
            ]
        ]
    },
    {
        "id": "31cd161a.2f6dda",
        "type": "debug",
        "z": "f0068d88.1517f",
        "name": "print pose",
        "active": false,
        "console": "false",
        "complete": "payload",
        "x": 720,
        "y": 300,
        "wires": []
    },
    {
        "id": "64ec1ad3.029844",
        "type": "delay",
        "z": "f0068d88.1517f",
        "name": "",
        "pauseType": "rate",
        "timeout": "5",
        "timeoutUnits": "seconds",
        "rate": "1",
        "nbRateUnits": "1",
        "rateUnits": "second",
        "randomFirst": "1",
        "randomLast": "5",
        "randomUnits": "seconds",
        "drop": true,
        "x": 370,
        "y": 300,
        "wires": [
            [
                "1461f4bb.3a3073"
            ]
        ]
    },
    {
        "id": "1461f4bb.3a3073",
        "type": "function",
        "z": "f0068d88.1517f",
        "name": "filter pose",
        "func": "msg.payload = msg.payload.pose;\nreturn msg;",
        "outputs": 1,
        "noerr": 0,
        "x": 560,
        "y": 300,
        "wires": [
            [
                "31cd161a.2f6dda"
            ]
        ]
    },
    {
        "id": "81037215.2ccc8",
        "type": "ros-server",
        "z": "",
        "url": "ws://127.0.0.1:9090"
    }
]
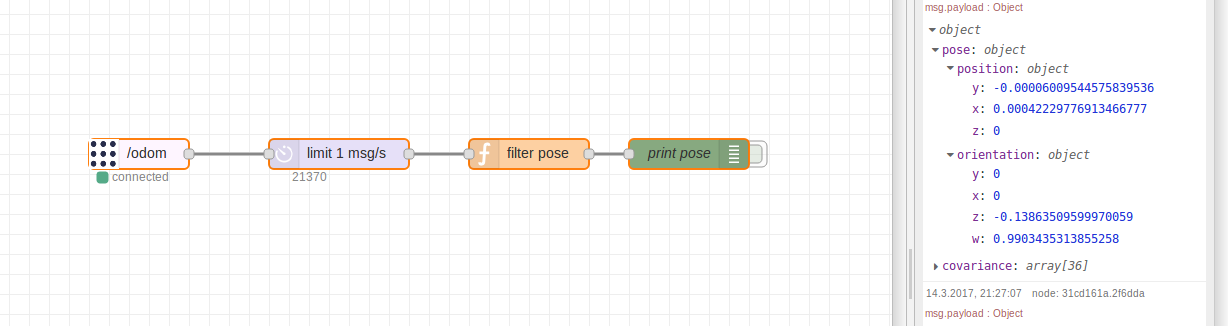
The image above shows a flow that processes and shows /odom messages from a ROS-based robot:
- subscribe to odom –> each /odom messages is inject into the flow from the left
- limit the potentially high rate of /odom to reasonable 1/s
- filter only the pose from /odom message leaving twist, etc. out
- print the pose object in a debug view on the right
Using the Gazebo simulator instead of a real Turtlebot 2
The exact same commands as shown above can also be used when you do not have a real robot. Only one command has to be changed in order to get data from a Turtlebot 2 in the Gazebo simulator. If you have a look at the “Boot the Software Stack” paragraph. Substitute the first command (bringup package) by:
roslaunch turtlebot_gazebo turtlebot_world.launch
That’s it! Happy hacking 😉
Hi, I enjoyed your helpful input about your initiative. Actually, we try to do similar thing with our AGV run by Raspberry Pi 3 and Arduino. I’m wondering whether you can share your comment about our issue.
NodeRED is hung when it failed to connect to ROS server (due to wrong URL etc) and sometimes we cannot open NodeRED any more.. We feel that this ihappens because the (re)connection trial interval from NodeRED is so fast that it spend all Its own CPU capacity when ROS server does not respond. Do you have any ideas to avoid this?
Appreciate your feedback.
Are this steps still valid? I’m trying to manage this to work. But no luck yet
Hi,
you are right, ROS indigo and Ubuntu 14.04 are a bit outdated. I will create a more recent tutorial soon. However, I am using ROS Kinetic on top of Ubuntu 16.04 at the moment. It is very similar. What config are you using? Where does it hang.
Marvin
Hi, I am also currently trying to get this to work, but am stuck. My current setup is running on a Raspberry Pi 4 with the Ubiquity Robotics ROS image (so running ROS kinetic on Ubuntu 16.04). For Node-Red, I used the curl setup script they provide, so I have v1.0.6 installed, with v12.16.3 of Node. I am not able to get it to connect to the server, anytime I deploy, I get the error message “TypeError: util.debug is not a function” from the server configuration node. I have tried several combinations for what the URI might be, but I cannot get it to connect. Any direction would be appreciated.
Hi Nick,
I do not know a solution yet. However, I used ROS a lot, especially Kinetic and also Node-RED. So, my first guess would be an incompatibility with Node v12. I already had problems using Node v12 in combination with Node-RED. Use Node v10 as recommended by the Node-RED team. This is the setup (plus Kinetic and 16.04) that I use successfully at the moment. Did you install Node-RED from NPM or from git source?
Best
Marvin
Hello! Has someone been able to do this with ROS2? A tutorial on that would be nice.