
In this second tutorial, we are going to learn how to publish drive commands the a ROS robot from Node-RED. To do so, we need to use the publish node from the node-red-contrib-ros nodes. Unfortunately, the original is not supporting drive messages at the moment, I forked that repo and modified the code on some lines. In order to use my forked repo, we need to reinstall node-red-contrib-ros from my Github space. I assume you have installed the software as shown in the preceding tutorial at this point. Do update the software as follows:
cd ~/.node-red
npm uninstall node-red-contrib-ros
npm install git+https://github.com/marvinferber/node-red-contrib-ros
Using the publish node
Now lets move back to the flow and set up the ROS publish node. If not done already, start Node-RED. We first need a new publish node and connect it to the ROS master that was configured in the preceding tutorial. As you might know as a ROS user, drive commands are published to /cmd_vel_mux/input/teleop using a data object of type geometry_msgs/Twist. Such a message consists of velocity commands for linear and radial velocities.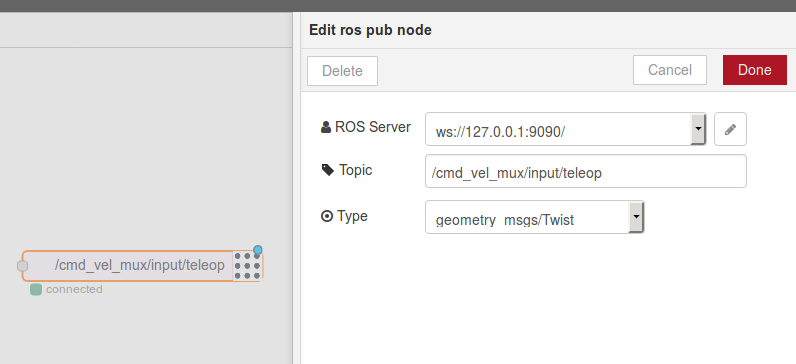
geometry_msgs/Vector3 linear
  float64 x
  float64 y
  float64 z
geometry_msgs/Vector3 angular
  float64 x
  float64 y
  float64 z
In Node-RED, we need to prepare a message with exactly the properties shown above using a function node for instance. Setting this message object of type geometry_msgs/Twist as msg.payload, we are now able to publish drive commands.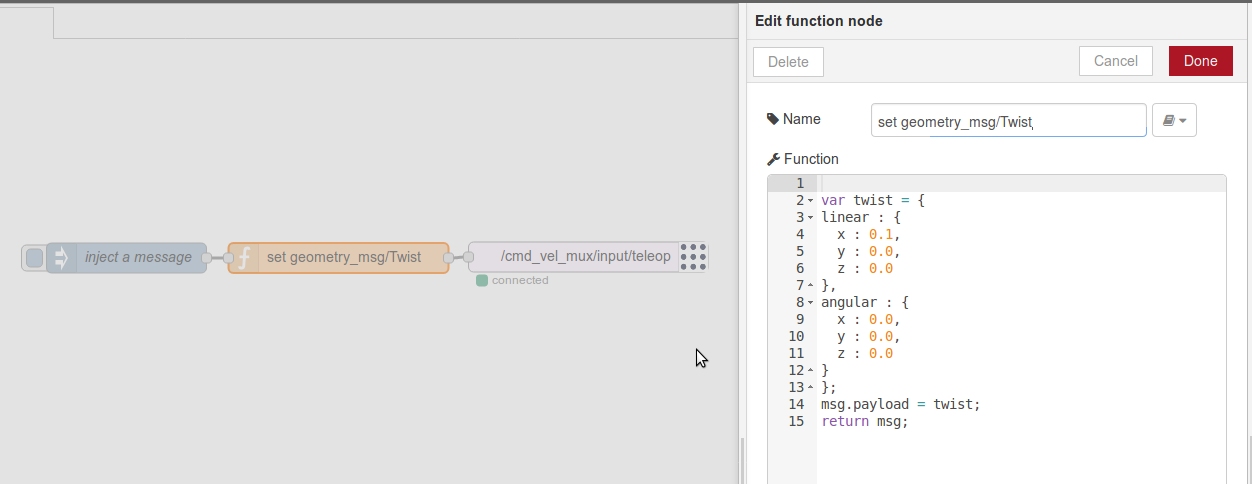
Publish messages in a loop
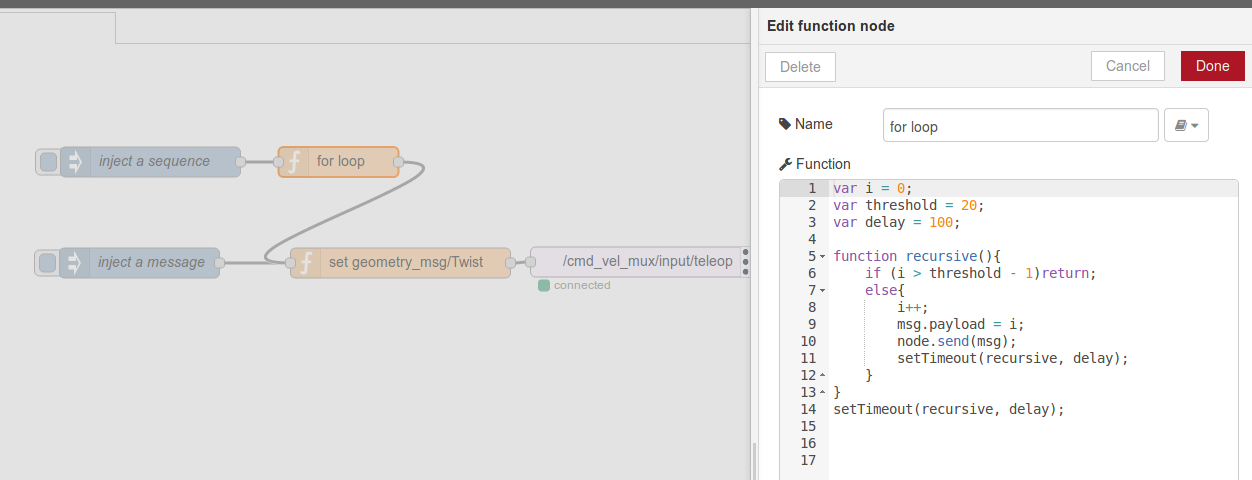
The last hurdle to make the robot actually move is to publish the drive commands in a constant loop at around 10-20Hz. There are many ways to implement a loop that publishes drive commands in Node-RED. You can implement a while loop following this blog post by a while pattern based on simple nodes only. Using simple nodes only, you can simply insert a delay node in your loop to slow down processing to a specific rate while keeping the event loop in Node-RED unstressed.
Another approach would be to use a function node and publish messages from within a Javascript loop. In this case, be care not to block the event loop using any type of busy waiting. See this post for an explanation. I used a recursive program to achieve a non-blocking loop as shown below.
Simulator users welcome
Again, this tutorial works perfectly fine for a simulated robot too. Be careful using drive commands on a real robot. We did not set up any safety mechanisms in this tutorial such as bumper stop or cliff detection.You can import the following flow into your Node-RED and try out the different possibilities of publishing drive commands. Start the process by injecting a single message or by starting the for loop to publish a sequence of messages.
[
    {
        "id": "b3b3ae01.82c708",
        "type": "tab",
        "label": "Flow 1"
    },
    {
        "id": "1edf948e.06392b",
        "type": "ros-publish",
        "z": "b3b3ae01.82c708",
        "server": "f50f6311.80b15",
        "topicname": "/cmd_vel_mux/input/teleop",
        "msgtype": "geometry_msgs/Twist",
        "x": 758.5,
        "y": 218,
        "wires": []
    },
    {
        "id": "1469c2ad.5ecf8d",
        "type": "function",
        "z": "b3b3ae01.82c708",
        "name": "set geometry_msg/Twist",
        "func": "\nvar twist = {\nlinear : {\n  x : 0.1,\n  y : 0.0,\n  z : 0.0\n},\nangular : {\n  x : 0.0,\n  y : 0.0,\n  z : 0.0\n}\n};\nmsg.payload = twist;\nreturn msg;",
        "outputs": 1,
        "noerr": 0,
        "x": 508.5,
        "y": 219,
        "wires": [
            [
                "1edf948e.06392b"
            ]
        ]
    },
    {
        "id": "fc72bc5c.ccea3",
        "type": "inject",
        "z": "b3b3ae01.82c708",
        "name": "inject a message",
        "topic": "",
        "payload": "",
        "payloadType": "date",
        "repeat": "",
        "crontab": "",
        "once": false,
        "x": 247.5,
        "y": 219,
        "wires": [
            [
                "1469c2ad.5ecf8d"
            ]
        ]
    },
    {
        "id": "f7e9cf01.9776a",
        "type": "inject",
        "z": "b3b3ae01.82c708",
        "name": "inject a sequence",
        "topic": "",
        "payload": "",
        "payloadType": "date",
        "repeat": "",
        "crontab": "",
        "once": false,
        "x": 258.5,
        "y": 118,
        "wires": [
            [
                "138cb7e5.f57e2"
            ]
        ]
    },
    {
        "id": "138cb7e5.f57e2",
        "type": "function",
        "z": "b3b3ae01.82c708",
        "name": "for loop",
        "func": "var i = 0;\nvar threshold = 20;\nvar delay = 100;\n\nfunction recursive(){\n    if (i > threshold - 1)return;\n    else{\n        i++;\n        msg.payload = i;\n        node.send(msg);\n        setTimeout(recursive, delay);\n    }\n}\nsetTimeout(recursive, delay);\n\n\n",
        "outputs": 1,
        "noerr": 0,
        "x": 446.5,
        "y": 118,
        "wires": [
            [
                "1469c2ad.5ecf8d"
            ]
        ]
    },
    {
        "id": "f50f6311.80b15",
        "type": "ros-server",
        "z": "",
        "url": "ws://127.0.0.1:9090/"
    }
]
That’s it! Happy hacking 😉
Hello Marvin, first of all, thanks you for your work.
I would like to know, how did you created your own type of msg to publish ?
I’m having trouble adding mine. I managed to add it to the option list from ros.html, but i can’t select it (going back to previously selected type when clicking done). I’m pretty sure i’m missing a simple step like setting it in another file, but can’t find which yet.
Thanks you.
Hi Thomas,
thanks for your comment. You are right, you have to add the message type to
ros.html. But, this is not sufficient. Ckeck my commit here https://github.com/marvinferber/node-red-contrib-ros/commit/1c130d546c784a4ae368d40ff7d0dd6860da25a1. I also had to fixros-publish-node.js. Before, it did not work at all. Hope this helps.Best, Marvin
Hi Marvin,
After many years I found this post is very interesting. Is there way to call ros service calls from node-red?