
Since I showed a nice simulation of Turtlebot 2 in a home scene in Gazebo at the MakerFaire Chemnitz, I am going to share information on how you can do this on your own. At first, I have to mention that many open source software is involved here. In summary:
- Sweethome3D (v. 4.3 and newer) modeling software and house designer
- Blender 3D 2.7 modeling software
- Python 2.7 for script-based model conversion
Be aware that all descriptions below have been tested an Ubuntu 14.04 LTS and should also work on derived distros such as Linux Mint 17.3, which I usually use.
The actual creation of a an SDF file as input for a Gazebo simulation is covered by a subsequent tutorial. The model we create here is necessary for the simulation of collisions and optical attributes of the scene. In this tutorial, we will create a model of a small flat in which the Turtlebot 2 can move around.
Creating a 3D scene in Sweethome3D for simulation
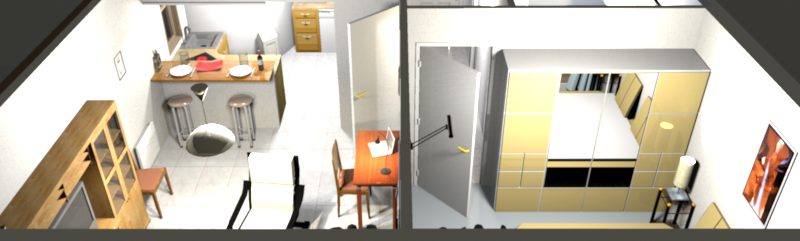
Once you have installed Sweethome3D (which is available from many Linux distro sources), there are a variety of example scenes to start from. Let’s choose SweetHome3DExample5.sh3d to work with. Just open this nice little flat in Sweethome3D. Unfortunately, this scene contains obstacles that can hardly be overcome by a Turtlebot 2: closed (and even half-open) doors! The reason why doors are a problem here is that the scene is static and doors will not move in the simulator. They stay closed. To change this, we would have to provide a physics model for the doors, too, which is far beyond the scope of this post. (Readers! Feel free to contribute here how doors can be made dynamic 😉 ) As a result, we should substitute all doors in the Sweethome3D scene by free passages of the same dimensions. The robot will appreciate this later when moving between rooms. As a second (optional) modification, I recommend to remove the ceiling from the Sweethome3D model. Having a ceiling will result in a non-transparent obstacle that makes it hard to look inside the flat from a birds position in the simulator.
Finally, export the scene as .obj file from Sweethome3D using the menu “3D view”. Fortunately, all textures will also be exported. The number of exported files may be huge, depending on the complexity of the scene with respect to texture.
I also want to mention explicitly that Sweethome3D can be extended extensively by custom textures for walls, floor and ceiling. Also, it is possible to import furniture either from self-made .obj files or from a variety of furniture libraries available on th Web. This makes Sweethome3D an excellent choice for creating semi-realistic scenes in a quick and effective way.
Convert .obj to .dae preserving textures using a Blender-based Python script
The .obj file that was exported from Sweethome3D cannot be used with Gazebo for simulation directly. It has to be converted to .dae format (COLLADA). Although this is a task that many programs can perform, many programs also fail to process textures correctly or require a lot of GUI clicking for the conversion. I found a nice Blender-based Python script that does the trick on command line easily. Thanks to AngryLoki for the code snippet that converts in the reverse order (dae2obj.py). However, installing the necessary dependencies is a bit tricky here.
- Install Blender 2.7 from IRIE Shinsuke PPA to get the required scripting libraries
- Use a Python 2.7 installation
The script below converts all .obj files an a directory input_dir and puts all output to a directory output_dir. Given that you named the file obj2dae.py, the script is invoked from a command line like this: blender --background --python obj2dae.py -- input_dir output_dir
# simple script to batch convert obj to collada preserving textures
# run as:
# blender --background --python obj2dae.py -- input_dir output_dir

import os
import sys
import glob
import bpy

if len(sys.argv) != 9:
    print("Must provide input and output path")
else:
    for infile in glob.glob(os.path.join(sys.argv[7], '*.obj')):
        bpy.ops.object.select_all(action='SELECT')
        bpy.ops.object.delete()
        bpy.ops.import_scene.obj(filepath=infile)
        outfilename = os.path.splitext(os.path.split(infile)[1])[0] + ".dae"
        bpy.ops.wm.collada_export(filepath=os.path.join(sys.argv[8], outfilename),include_uv_textures=True, include_material_textures=True)
Voilà, we just created a 3D model that can be used inside the Gazebo simulator. It will preserve texture. Please keep in mind that you can use any Sweethome3D model as input. Be creative!
Happy Hacking 😉
Hi Dear!
Nice tutorial on creating .obj & dae file .
How to : Create SDF file as input for a Gazebo simulation ?